Here you will find answers to frequently asked questions about netboard.me
You can always contact us via support@netboard.me to get more information on any question about our site.
Video tutorials
Frequently asked questions
General Questions
Netboard is a world wide accessible web page where you can easily gather videos, photos, RSS feeds, presentations, links and many more things from the web. Netboard is the best way to combine and share different web content.
There is no limit for that.
We don't have such plans
Complaint is a way to notify administrators about netboards that violate Terms of Service.
Please describe it using Feedback widget (Contact Support) at your personal page or just email us about the problem (support@netboard.me).
We will try to resolve the issue as soon as possible.
Your feedback about features you want is very important for us.
Email us about it (support@netboard.me) and we will try to add it.
netboard.me, as European company, is fully committed to complying with the GDPR
Your data is stored and processed in European Union.
We do not sell and/or distribute user data in any other way.
Our Terms of Service and Privacy Policy cover GDPR aspects.
We committed to protect the privacy and security of our users.
We are committed to making further improvements to address any issues related to GDPR.
In the European Union
Your data is stored and processed in Germany (Frankfurt and Falkenstein) and Netherlands (Amsterdam).
Towermates OÜ (Estonia, European Union)
Sepapaja 6, Tallinn 15551
No
We do not sell or share user data.
No
We use the following third-party services:
Mailchimp to send emails. Mailchimp is GDPR compliant.
UserVoice to receive and respond to support requests. UserVoice is GDPR compliant.
Paddle to receive payments. Paddle is GDPR compliant.
OpenAI is used to provide optional features such as AI-powered question answering and quiz generation. Use of these features is entirely voluntary. Netboard.me does not transmit your personal data to OpenAI. Only the content you explicitly choose to process (e.g., a post, document, or netboard), along with any questions you enter into the chat, is securely transferred for processing. While such content may occasionally include personal information, it is under your control and never shared automatically. These services are provided under a Data Processing Agreement (DPA) with OpenAI Ireland Ltd, in compliance with the GDPR. OpenAI is committed to data privacy and security.
Netboard.me is committed to providing digital accessibility for all users, including individuals with disabilities.
We continuously work to improve the user experience and apply relevant accessibility standards. If you encounter any accessibility barriers on our website, please contact us at support@netboard.me.
Access Control
Any person in the web.
If you are a Personal account or Organization account owner:
No. No one else can see your private netboards.
If you are an Organization Instructor:
Yes. The Organization account owner can access your private netboards.
If you are an Organization user without the Instructor role:
Yes. Your assigned Instructor (the teacher who manages your account) and the Organization account owner can access your private netboards.
Yes
You can select friends who can see your private netboard at your personal page using "Who can see this netboard" action. Also, you can do it in the netboard menu using "Grant access" option.
You can share a netboard access link with someone without a netboard.me account.
It will allow them to collaborate on your netboard.
You can generate a Read link to allow them to see and comment on your private netboard.
You can provide an Edit link to allow them to edit your netboard with the same privileges as a registered co-author. Both links work with private and public netboards.
Netboard Editing
Yes
Just drag the post to the target tab name and its content will be shown.
Yes
Just drag and drop the tab while your netboard is in Edit mode.
Immediately after you save them.
Yes.
Just post the link, which Google suggests you for the document sharing.
Yes.
You can use tags to quickly filter posts on the netboard (e.g. #level1 or #level2). Just start any word with "#" to create a tag.
Trophy score is calculated automatically basing on the type and amount of content, number of followers and votes.
Higher trophy score affects search results rank and netboard position in the Top rated list of the Organization Explore page.
Yes. We have plugins for Google Chrome and Firefox.
They work via context menu once installed.
Click right mouse button on the content you want to post (link, image, selected text, free space on the page to post a link to this page, etc.) and select Post to netboard from the appeared context menu.
By the default netboard.me tries to fill empty space to make the board to look as a fancy Web Page.
Sometimes strict posts order is required. For this case you can use Ordered or Notes alignment.
The difference between them is height equalization which is not performed with Notes alignment.
To switch an alignment you need to enable Edit mode, open Template tab and chose an option from alignments menu.
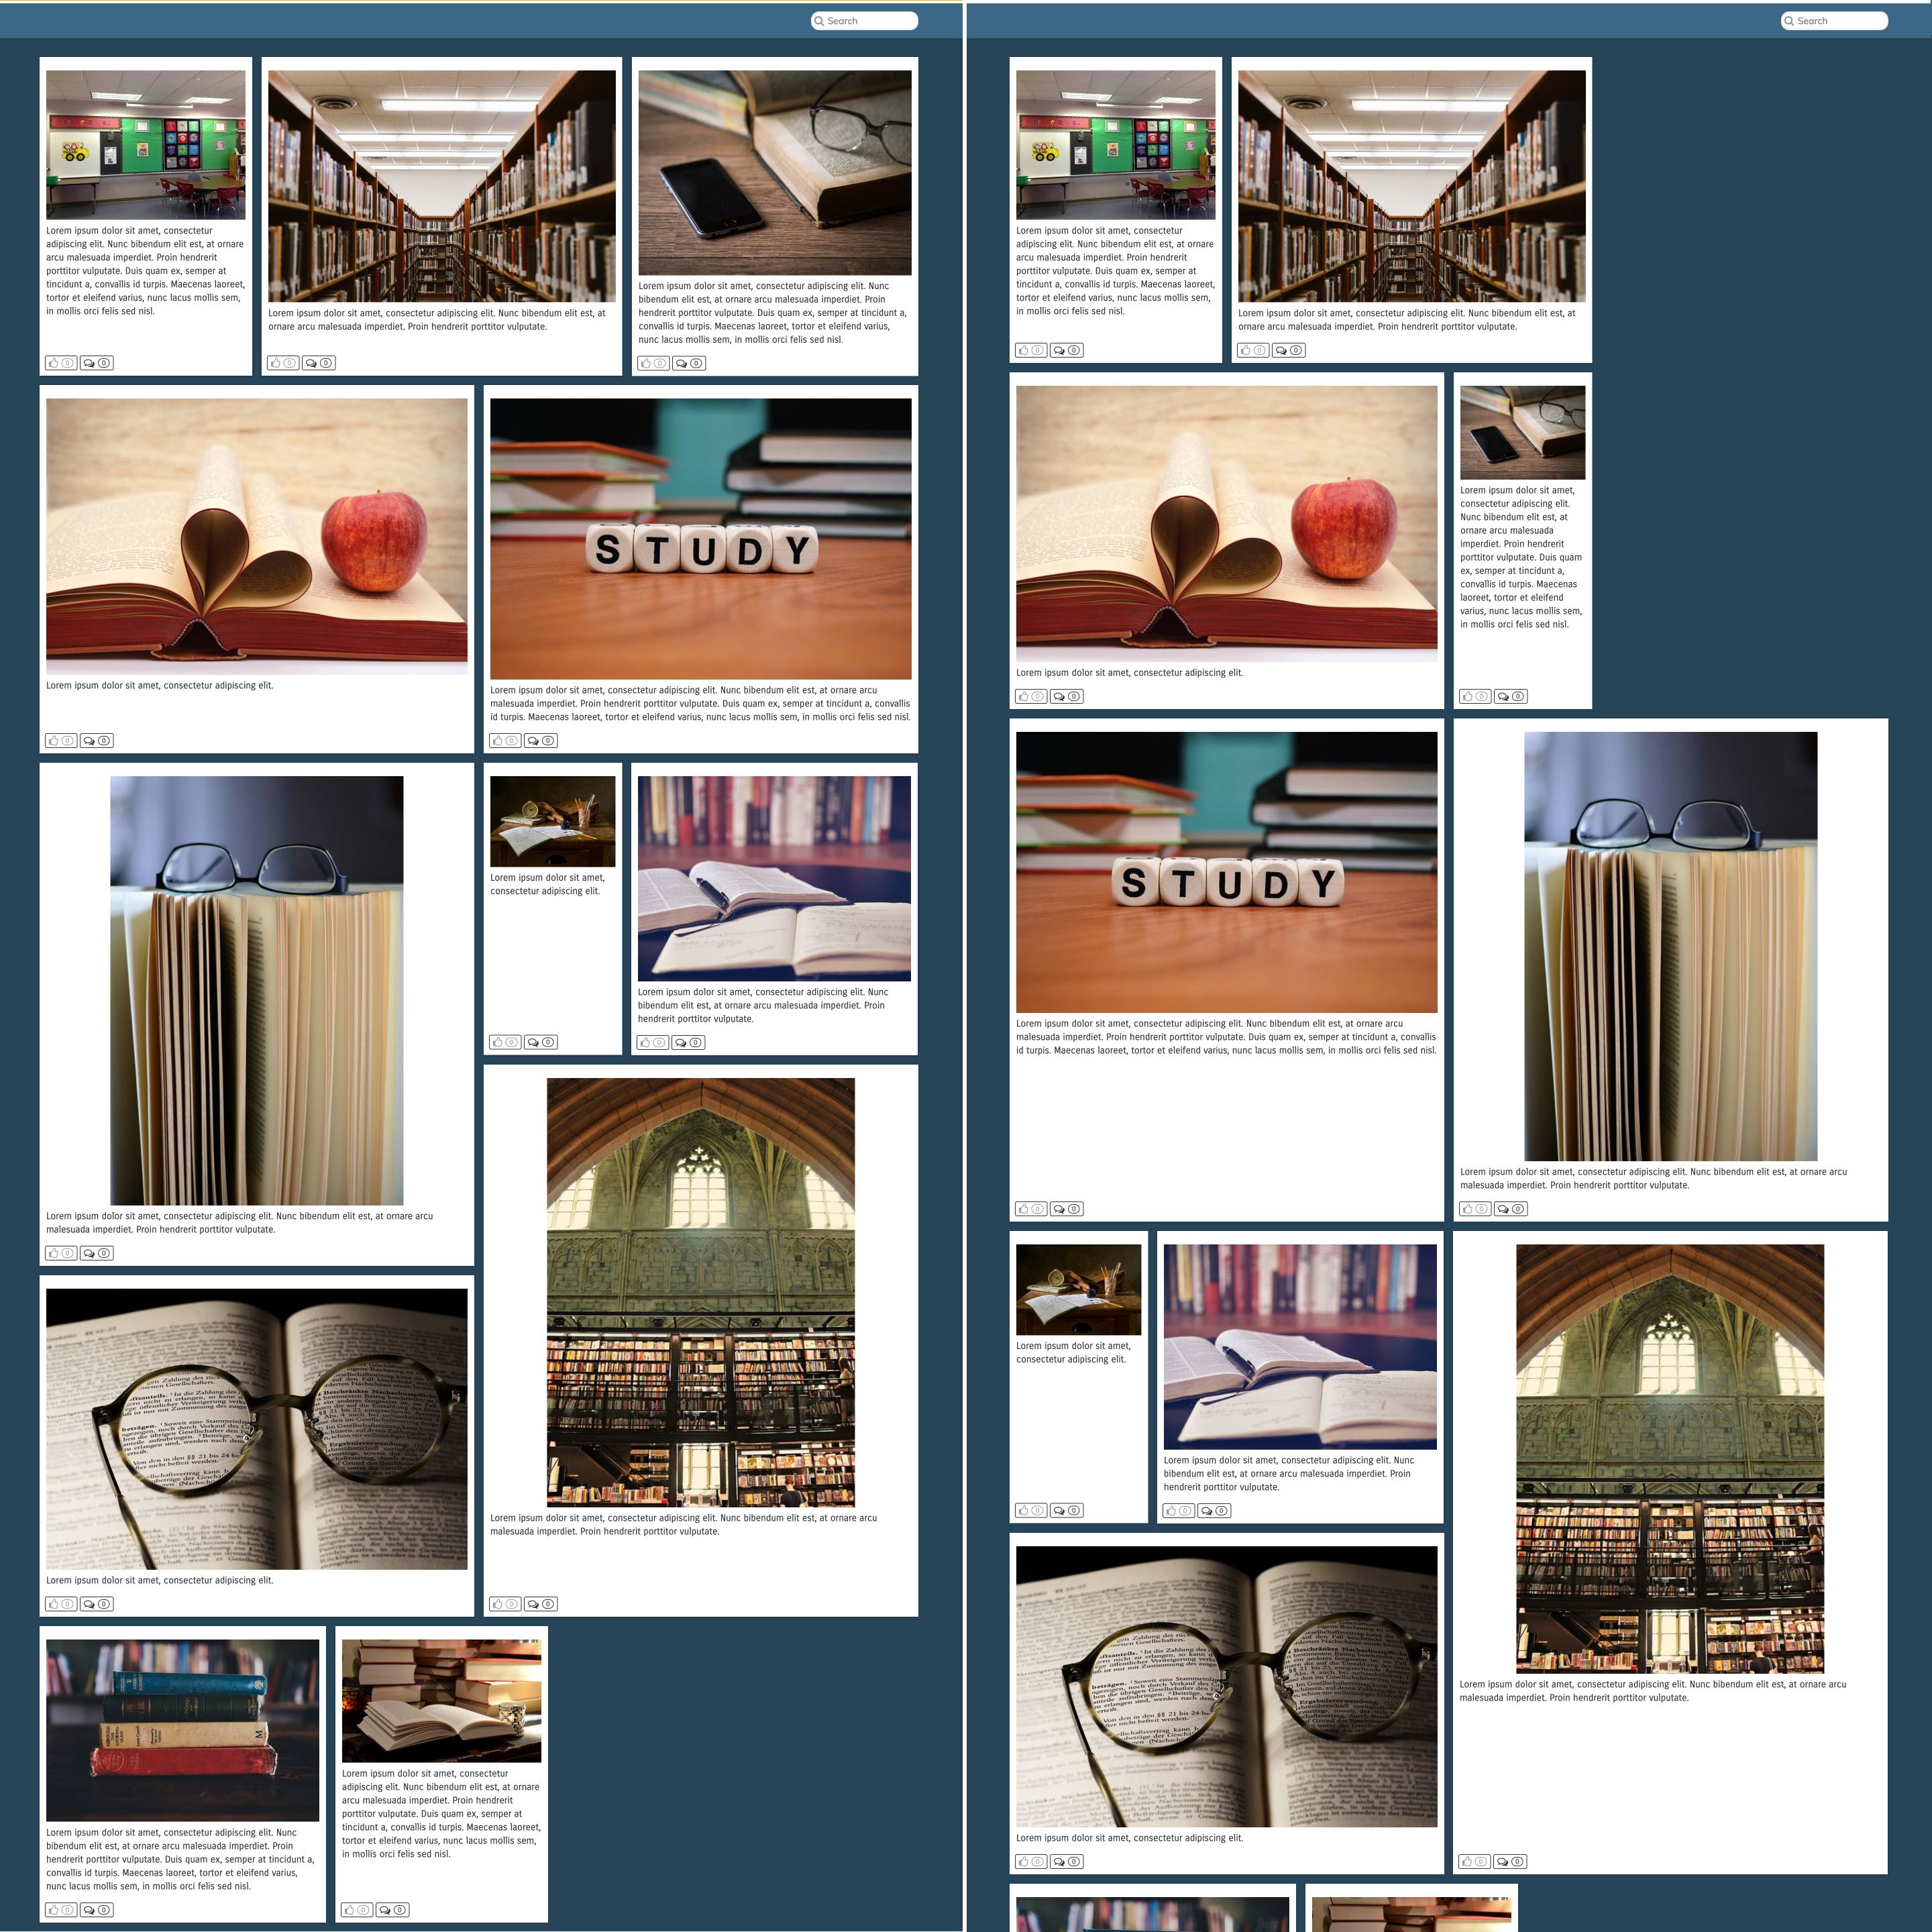
In Ordered alignment, the layout maintains the original order of the posts, even if this approach results in empty spaces within the layout.
Conversely, the Default alignment prioritizes filling all empty spaces on the page, which may result in slight alterations to the order of posts.
You can see the difference in the image below. Default alignment is on the left, and Ordered alignment is on the right.
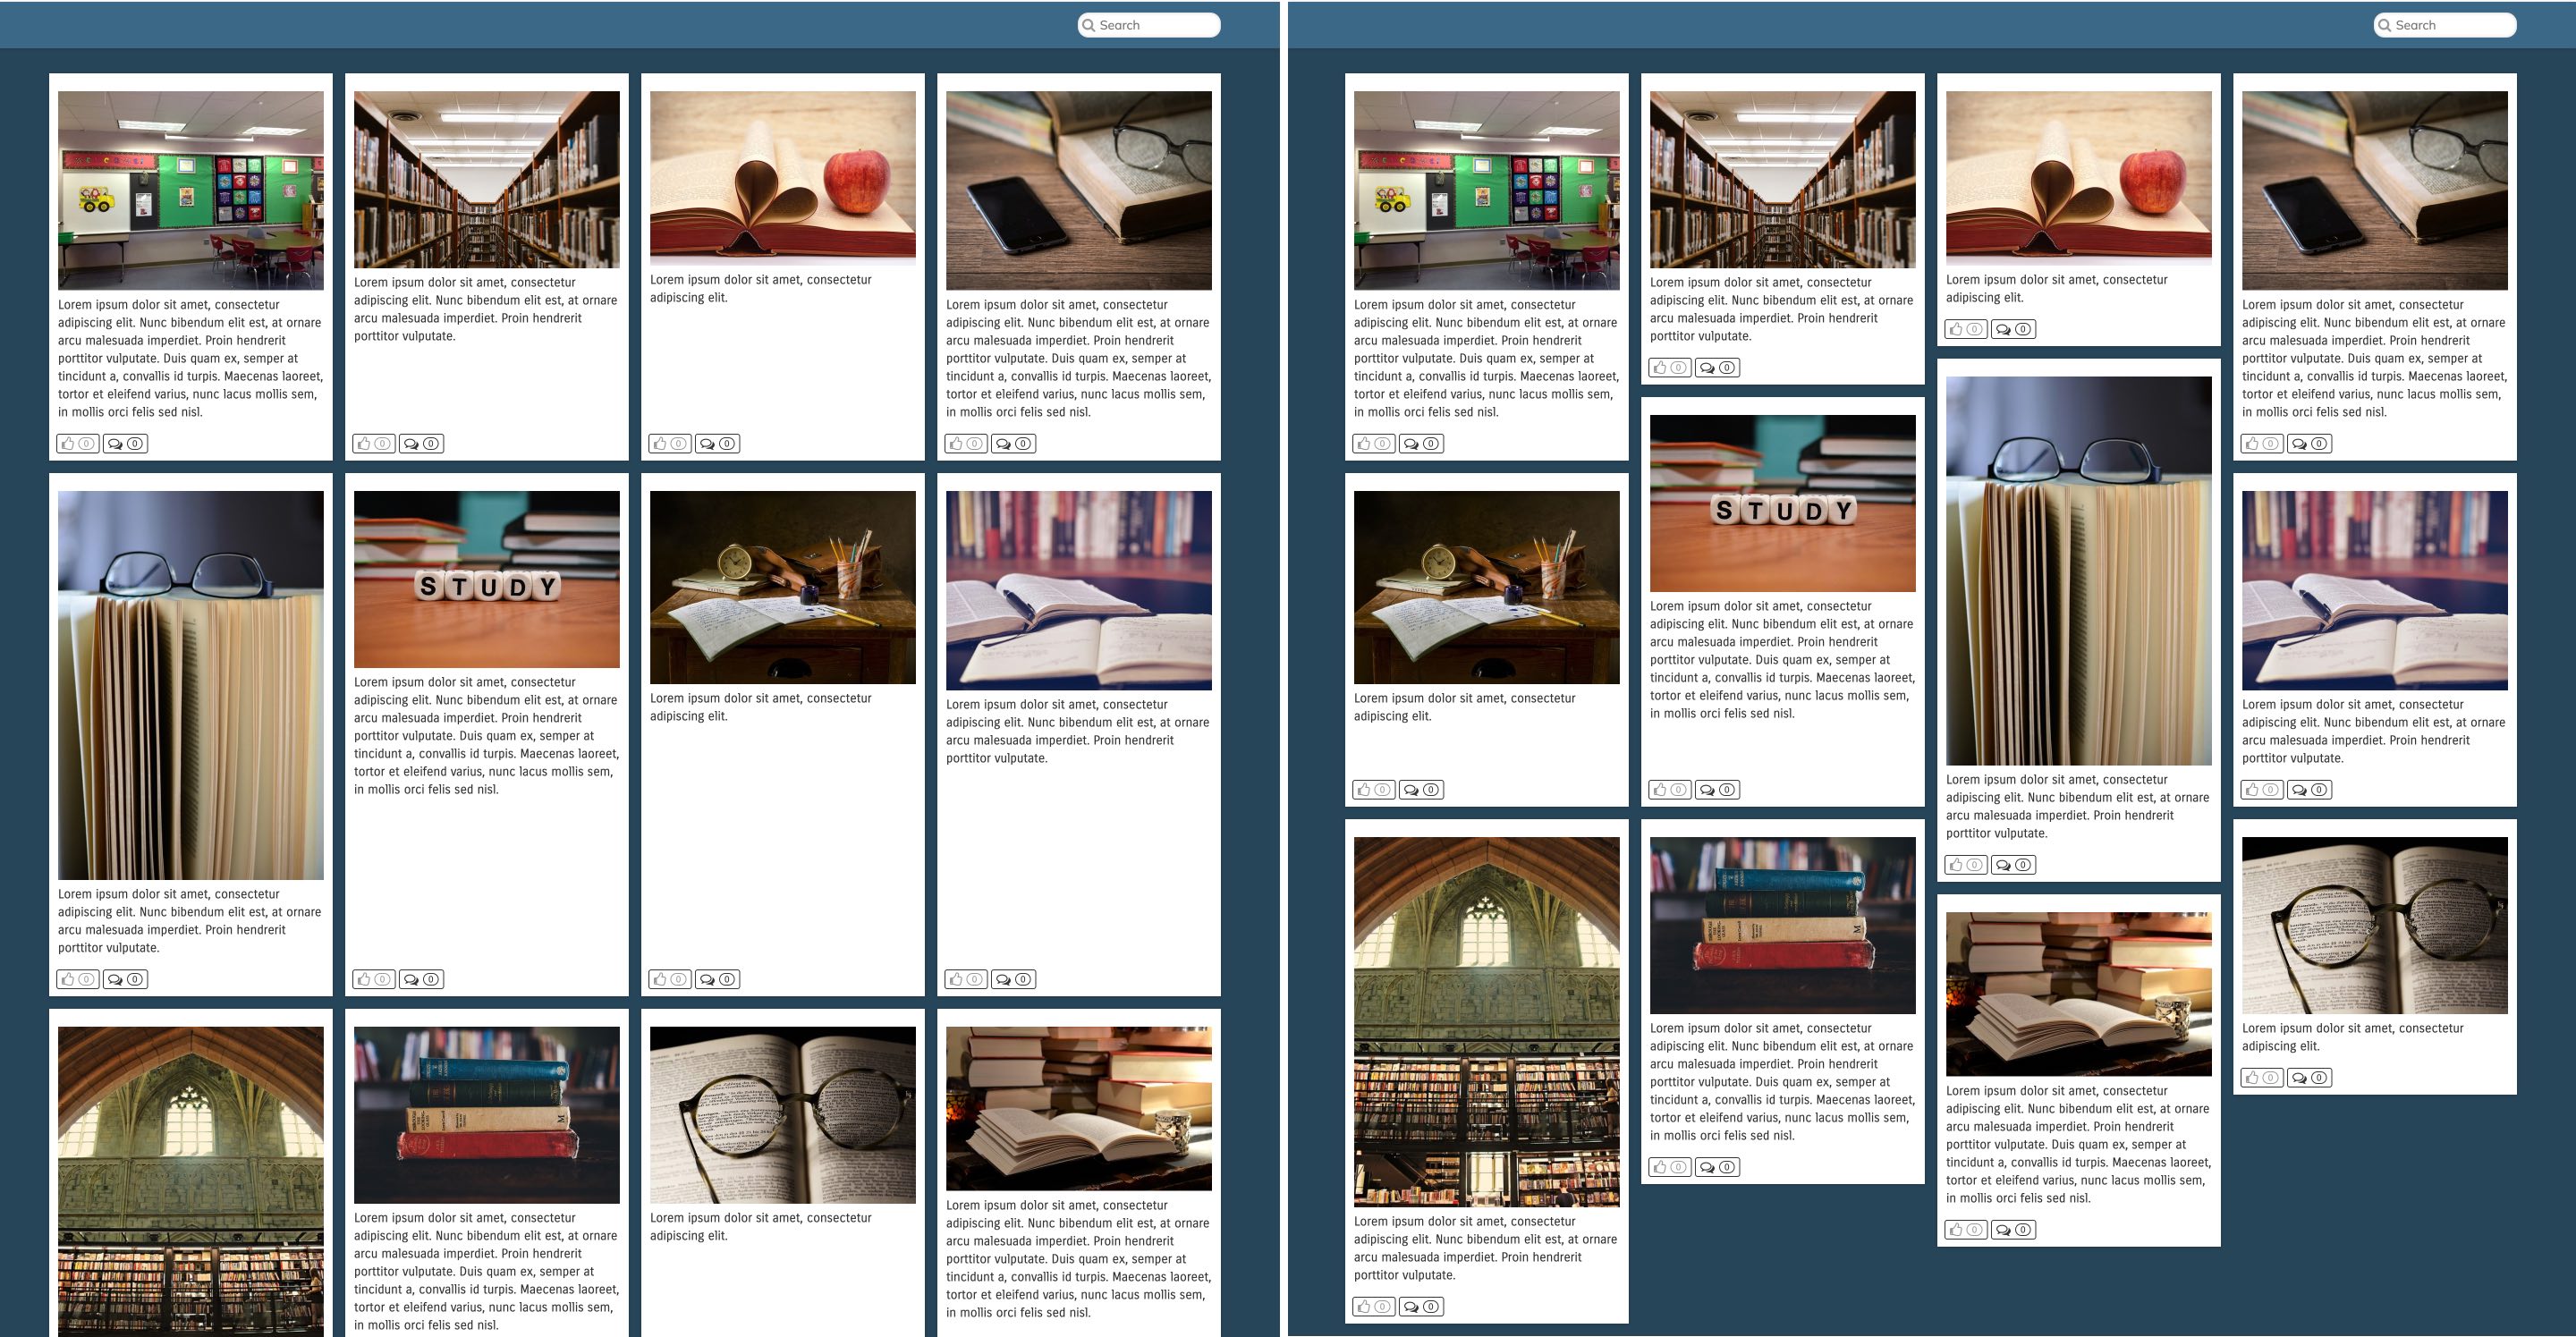
Mosaic alignment makes your netboards fancier and more compact.
You can see the difference in the image below. Default alignment is on the left, and mosaic alignment is on the right.
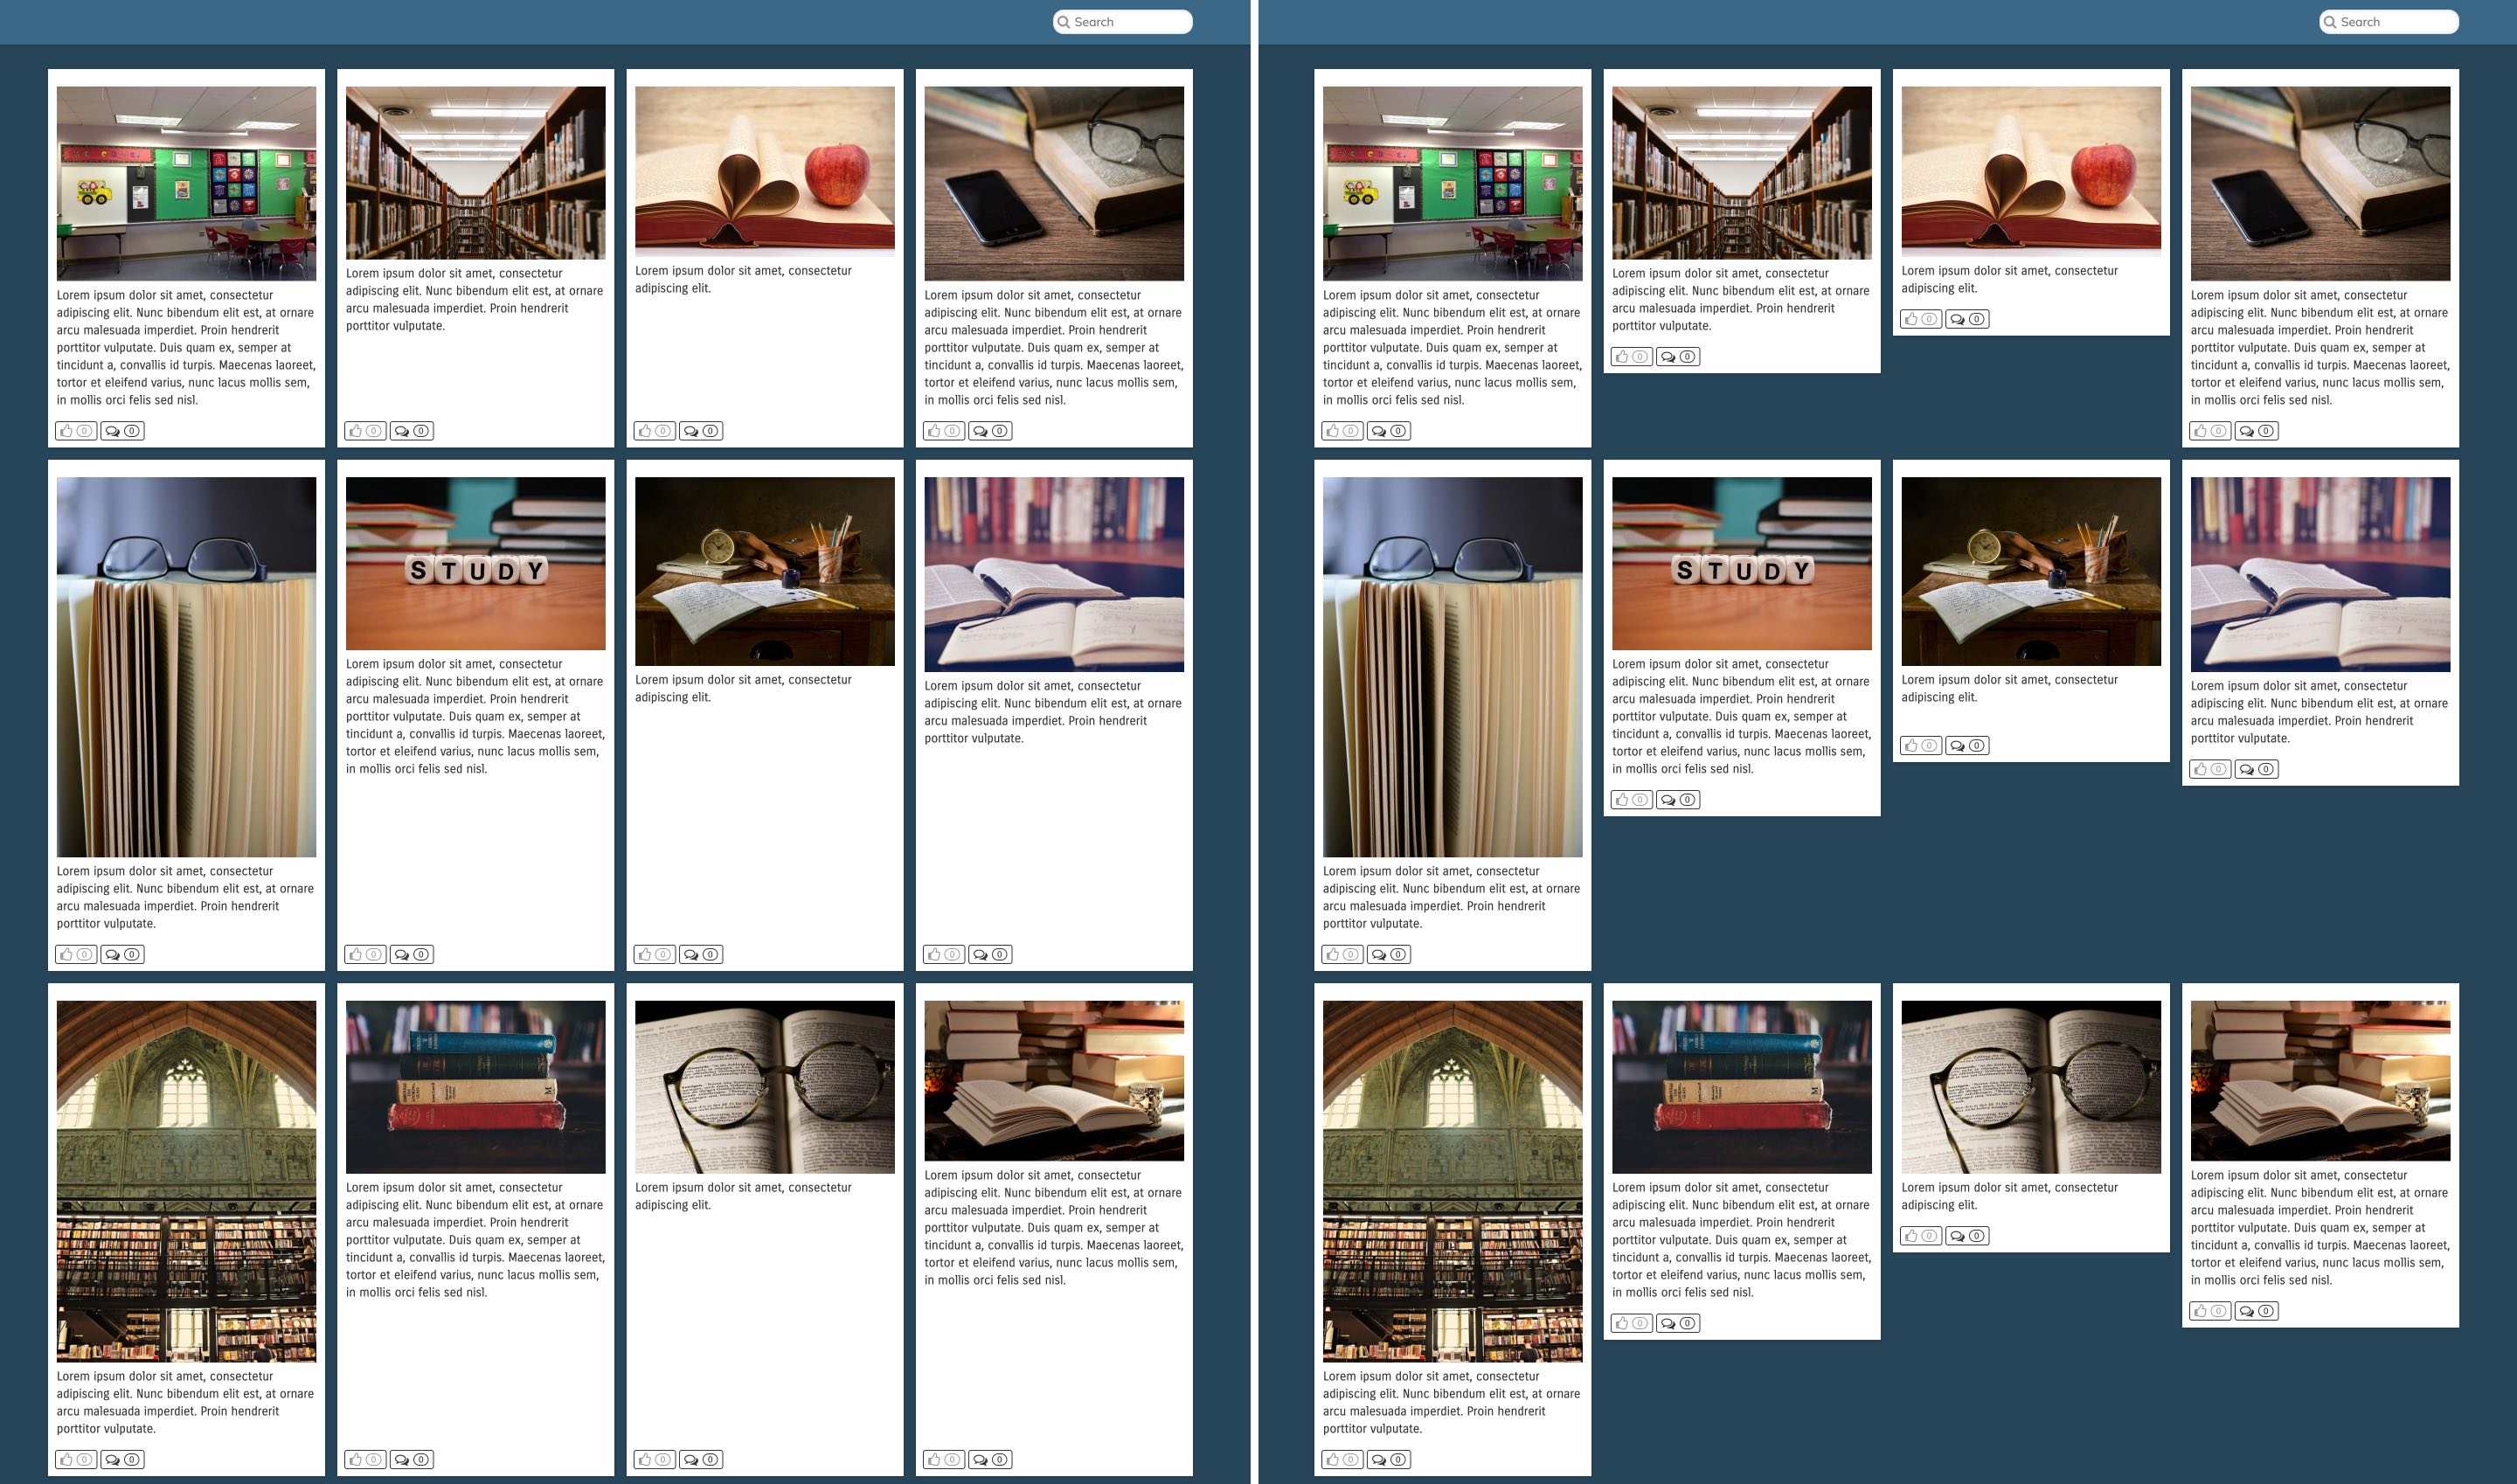
Notes alignment functions similarly to Ordered alignment but does not equalize the height of posts.
This means that while it maintains the original order of the posts, the individual posts can vary in height, potentially leading to a more dynamic or varied layout.
Like Ordered alignment, this approach may result in empty spaces within the layout due to the commitment to preserve post order.
You can see the difference in the image below. Default alignment is on the left, and Notes alignment is on the right.
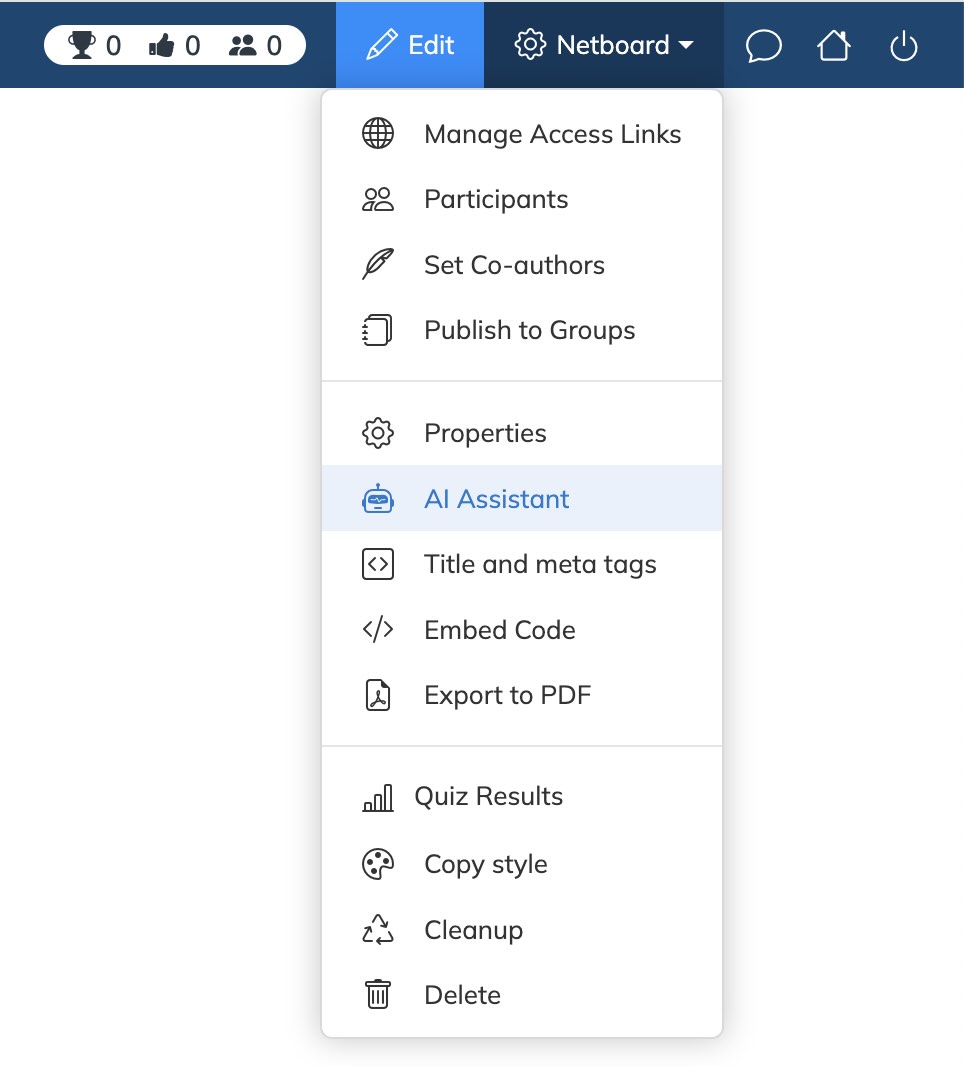
You can enable the AI Assistant on any of your netboards to let it answer students’ questions — using the content you've added.
To activate it, open your netboard and select AI Assistant from the netboard menu:
The assistant will begin indexing your documents, text posts, and links. Once indexing is complete, the chat widget will automatically appear on the netboard — as a button in the bottom-right corner that looks like this:

The AI Assistant only works with documents, text posts, and links.
It currently does not support videos or audio files.
It also answers strictly tied to your content, using the data you have added.
If a student asks a question that is unrelated to the content on the netboard — or if there isn’t enough context to generate a response — the assistant will reply with a message saying that there’s not enough information available.
This helps avoid confusion and ensures students only get answers that reflect the materials you’ve shared.
Once the assistant is enabled and indexing is complete, the widget will appear on the netboard for:
- Users added as Participants or Co-authors
- Anyone accessing the netboard via a shared access link
If you're using an organization account:
- Only users with the teacher role can enable the assistant
- The widget will then be available to all members of your organization who have access to the netboard
You can create quizzes for posts that include links or uploaded documents.
To do this:
- Switch your netboard to Edit mode
-
Open the post’s menu and select AI Quiz
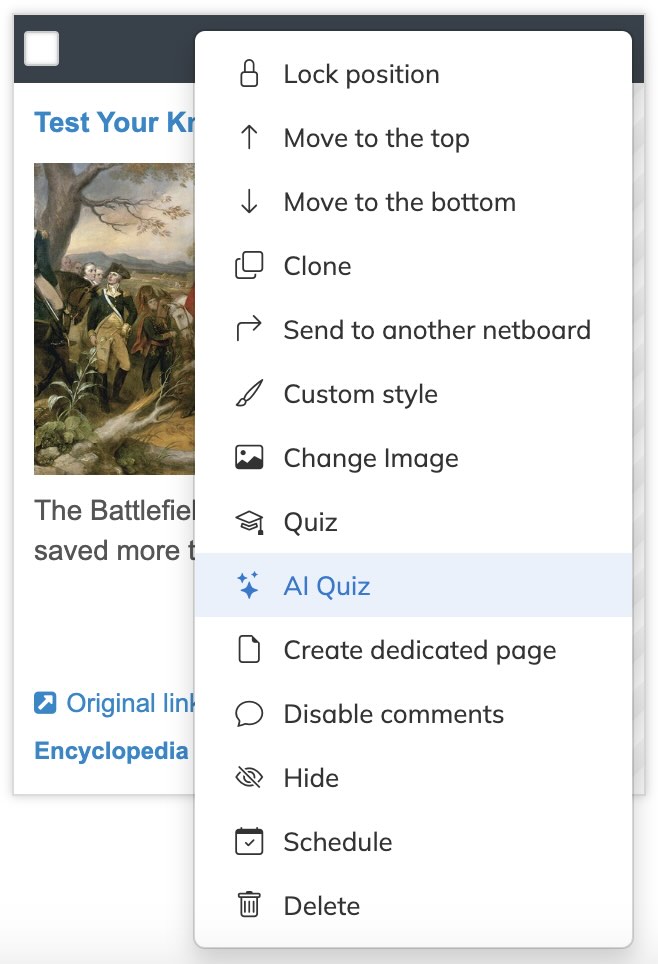
You can also select multiple posts at once and choose Create Quiz with AI from the Edit menu.

No, you don’t have to wait.
You can click Save at any time — your changes won’t be lost.
Quizzes that are successfully created will appear automatically.
Any that fail will be automatically removed.
There are a few common reasons why quiz generation may fail:
- The AI couldn’t extract text from the document or link
- The source doesn't contain enough useful or relevant content
- The website blocks automated access (for example, it may display a Please wait while we check if you're human message)
The AI can only create quizzes when there is enough readable and meaningful content available in the source.
If the page contains only a login form, a list of links, or general information without a concrete topic, there may not be enough material to generate questions.
Important: AI uses the same text you see when opening the link in your browser. If you don’t see useful content, neither will the AI.
Just like any quiz you create manually.
Go to the Quizzes section in your profile, find the quiz, and open it to review and edit as needed.
It's configured in your netboard’s settings.
By default, quizzes can be taken by everyone with whom you’ve shared the netboard, including:
- Participants
- Co-authors
- Users with access links
You can find detailed results in the Quizzes section of your profile.
For a full overview of all quizzes on a specific netboard:
- Go to Quizzes > Reports > By netboard page
-
You'll see a report showing which quizzes exist on the netboard and who completed them

You can click any cell in the report to view more details — including all attempts made by each user, their answers, and their best result.
- If you use an organization account, you can additionally select groups to see which members haven’t taken any quizzes on this netboard
-
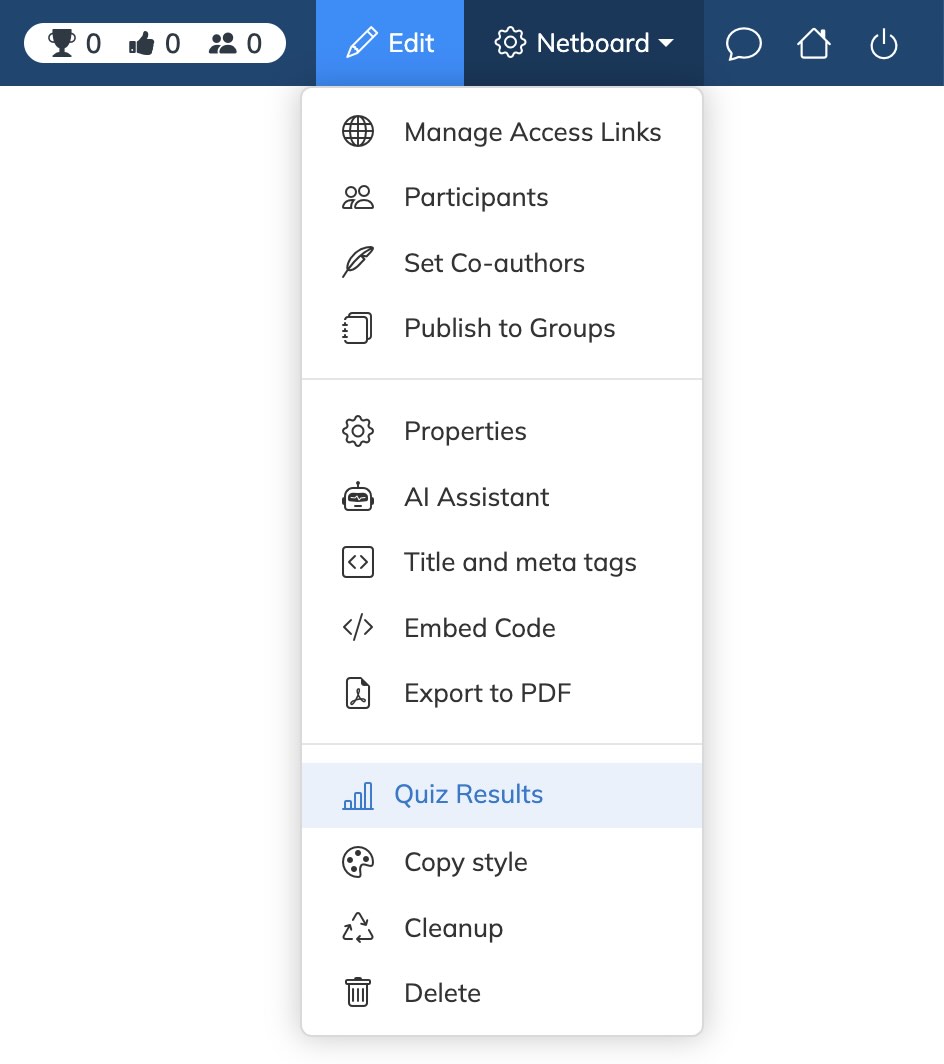
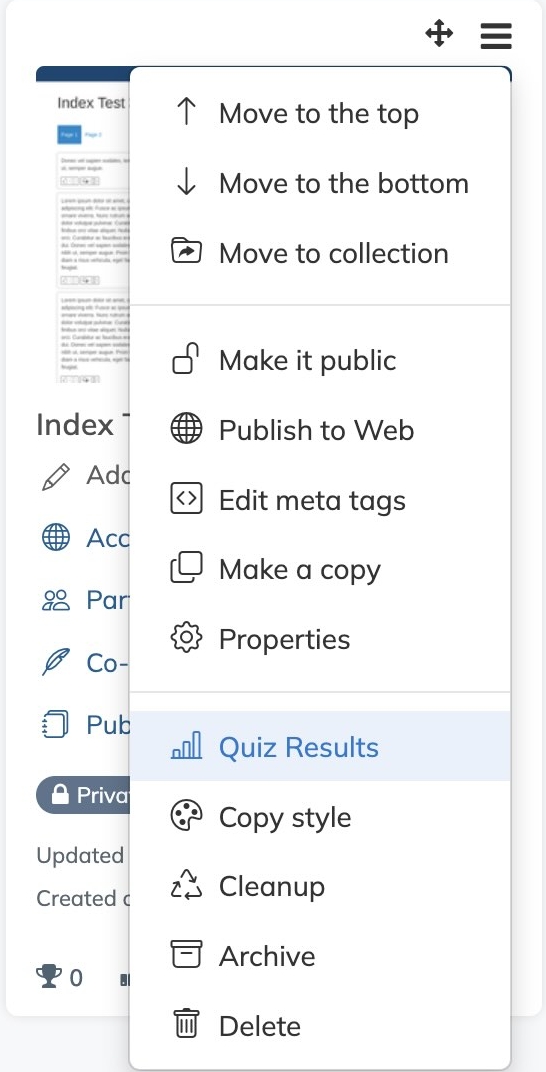
Once there are quiz answers, a Quiz Results link will appear in the netboard’s menu. This takes you directly to the report for that netboard.
Co-authoring
By the default co-author has limited ability to edit your netboard.
He/she can make new posts and delete previously added posts.
You can give more options to co-authors (customizie netboard theme/template and/or edit other users content) on the netboard's settings screen.
Yes
Co-author will gain access automatically.
When you switch your account type to Organization you get an ability to register own users and create users groups.
In your Settings
You should open Account tab of the setting screen.
Yes
Email address is optional for users created within Organization.
A user who has never logged in is marked as inactive.
After the first successful login the user is marked as "Active".
Only users of yours and friendly Organizations
In case the user has the Instructor role, her/his followers can also collaborate with her/him.
Internal netboards are accessible only by users within your organization.
You can allow the access for friendly organizations, giving the Internal trust level to your friendship.
Internal netboards can also be shared, just like Private netboards, to open access for specific users or groups.
Owners can establish friendships between their accounts.
Friendship allows users of friendly organizations to collaborate (share, follow, vote, comment, etc.) and to access each other.
Once Friendship is established, it's possible to create common groups with users of the friendly organization.
Users of the friendly organization with "Internal" trust level can access your organization internal netboards.
Only account owner can request a friendship of another account.
You should click "Friendship Request" button on the profile page of the owner of another account.
No
Only two Organization accounts can establish a friendship.
In your Settings
You should open Friendship tab of the setting screen.
Once you publish a netboard to the group it creates or updates Group Library.
Group members see published netboards in the Library section and receive updates on these netboards changes.
If you share your netboard with students from another organization, their assigned Instructor and their Organization account owner will also have access to the shared netboard.
Currently, we support the following user roles:
LMS Student - can only log in to netboard.me via LMS, has no password, no own profile panel and cannot create own netboards.
Regular Student - can't publish content to the Web and her/his profile is accessible only by users from the same or friendly Organization.
Student With Web Access - users with this role can publish content to the Web and create access links to own netboards. Users profile are open, but only users of yours and friendly Organization can collaborate with them.
Instructor - has almost the same rights as an account owner. Instructor can't create or edit other instructors but can create and manage student accounts and groups. Instructor profile is open and her/his followers can collaborate with her/him. Instructor can share private netboards externally.
There are two possible reasons:
The netboard is private or does not have enough content to be shown.
There is a rating (see Trophy score question) threshold which is used to prevent empty and incomplete pages from being displayed.
Netboard.me can be configured as an LTI 1.3 Provider with any LMS that supports LTI 1.3 integration.
To set up the integration, you must have admin access to your LMS and have an organization account on netboard.me.
After setting up the integration:
- Teachers can add their netboards as an activity (resource, content, etc., depending on specific LMS terminology) to the course.
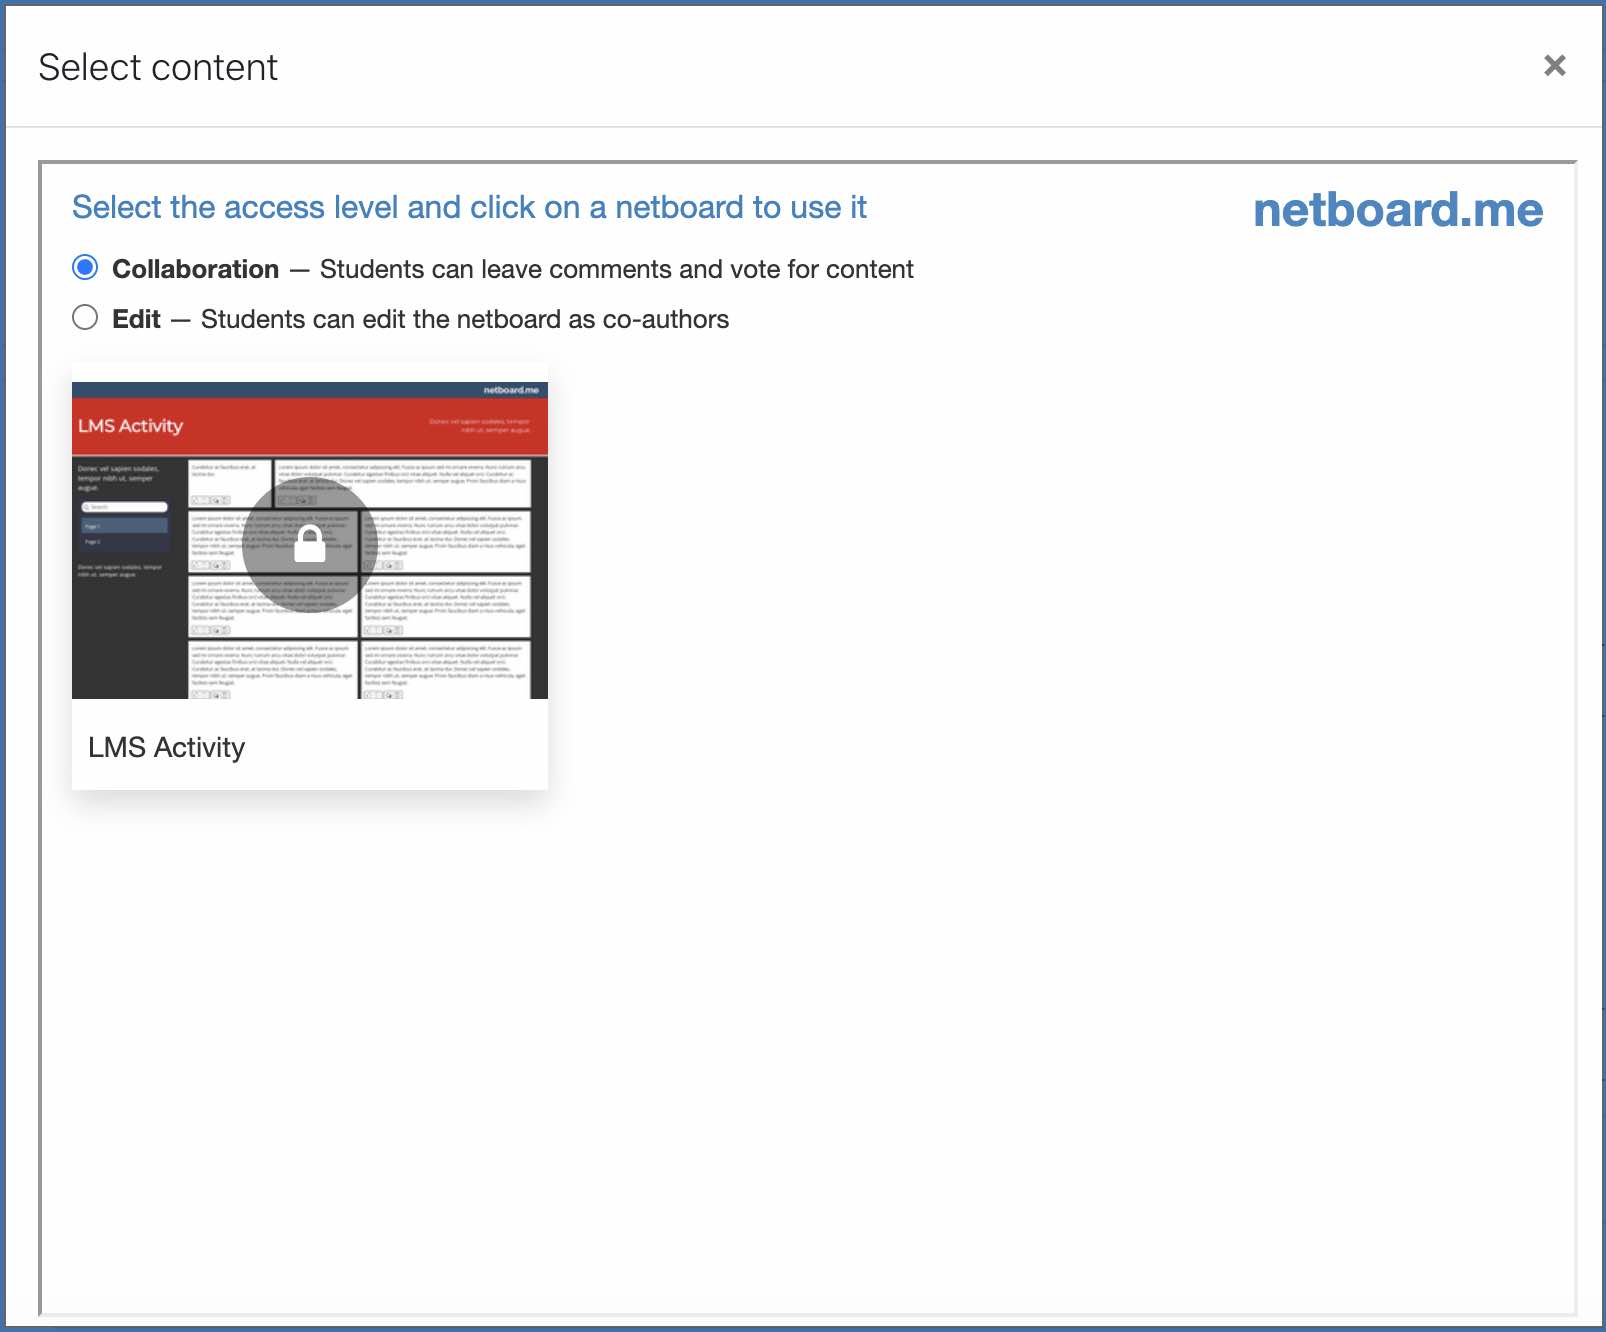
- When students open a netboard from the LMS, they are automatically granted permission to read or edit, depending on the teacher's choice.
Go to your Account Settings > LMS tab, select the LMS option you want and follow the instructions to set up LMS integration.
When a user first enters netboard.me through the LMS, netboard.me tries to find the user in your organization's account using the user's email address provided by the LMS.
If no matches are found, a new user is created:
- A teacher is created with the Instructor role.
- A student is created with the LMS Student role.
- They can reset the password and log in to netboard.me directly instead of through the LMS.
- You can create teacher accounts in advance with the same email address they use in your LMS. In this case, they can log in to netboard.me as regular users and prepare materials. Netboard.me will match them with their email address when they log in through the LMS to select a netboard to share.
- They don't have a password, they don't have their own profile panel, and they can't log in to netboard.me directly.
- The administrator and instructor can change the LMS Student user role to a different role. The user account will then work like a regular netboard.me user account with its own profile panel, the ability to create netboards, and log in to netboard.me directly.
The account administrator must manage teacher accounts in netboard.me. Netboard.me does not receive notifications when a teacher, for example, resigns from the school or changes their email address.
To prevent the number of unused student accounts from growing, the administrator can configure the LMS Students retention policy - the number of days that netboard.me must retain unused LMS Students accounts.
Generally speaking, the way you add a netboard to a course in an integrated LMS depends on how it has been configured by the LMS administrator. Below we describe typical cases for some popular LMSs.
The general approach is to add a netboard as a course activity, content, or resource, depending on your LMS. This may be called differently in different LMSs, but there is always a common action of selecting a link from the LTI 1.3 Provider (netboard.me).
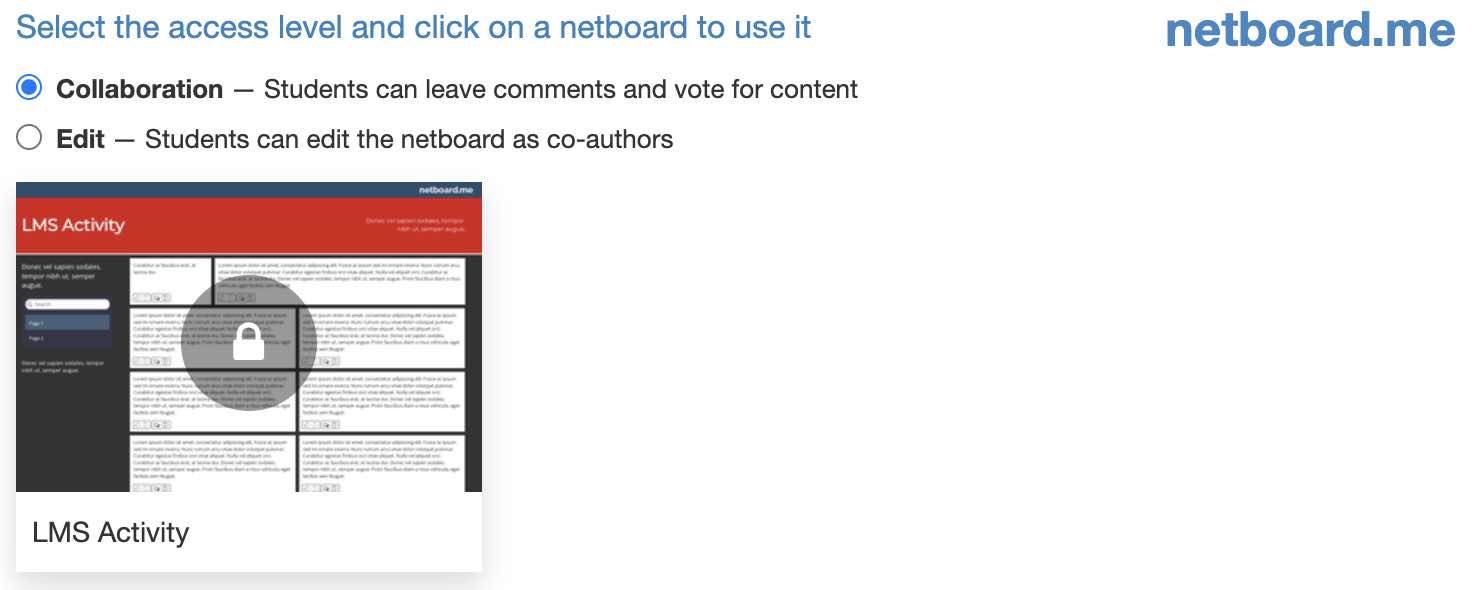
When you add a netboard to a course, you will always see this window (it can be different sizes and open in a pop-up window or another browser tab, depending on the specific settings):
Make sure your Moodle administrator has configured the netboard.me LTI integration.
- Open the course to which you want to add a netboard.
-
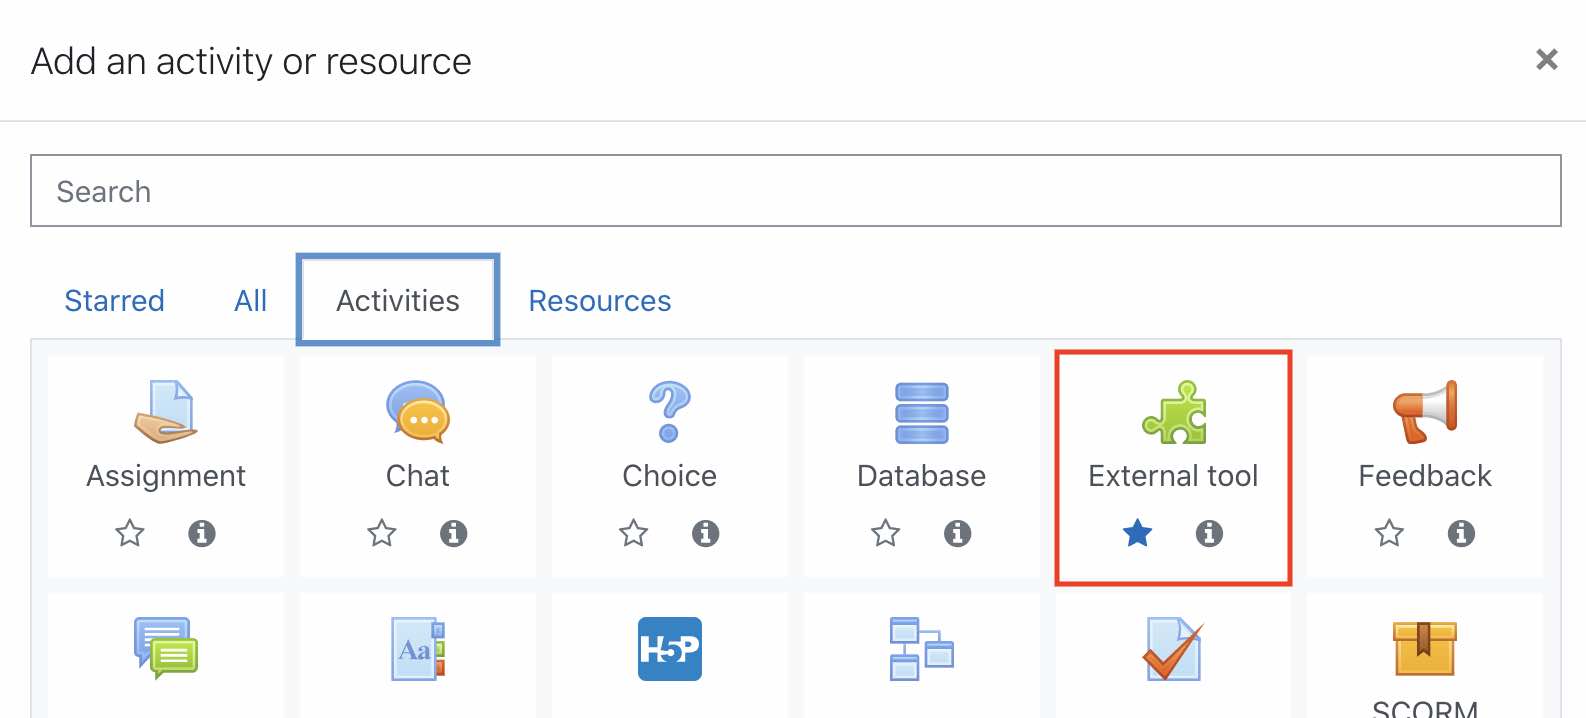
Click the Add an activity or resource button.

-
Select the External Tool option on the Activities tab.
-
Select the netboard.me tool (it may be named differently by your Moodle administrator) in the Preconfigured tool selector and click the Select content button.

-
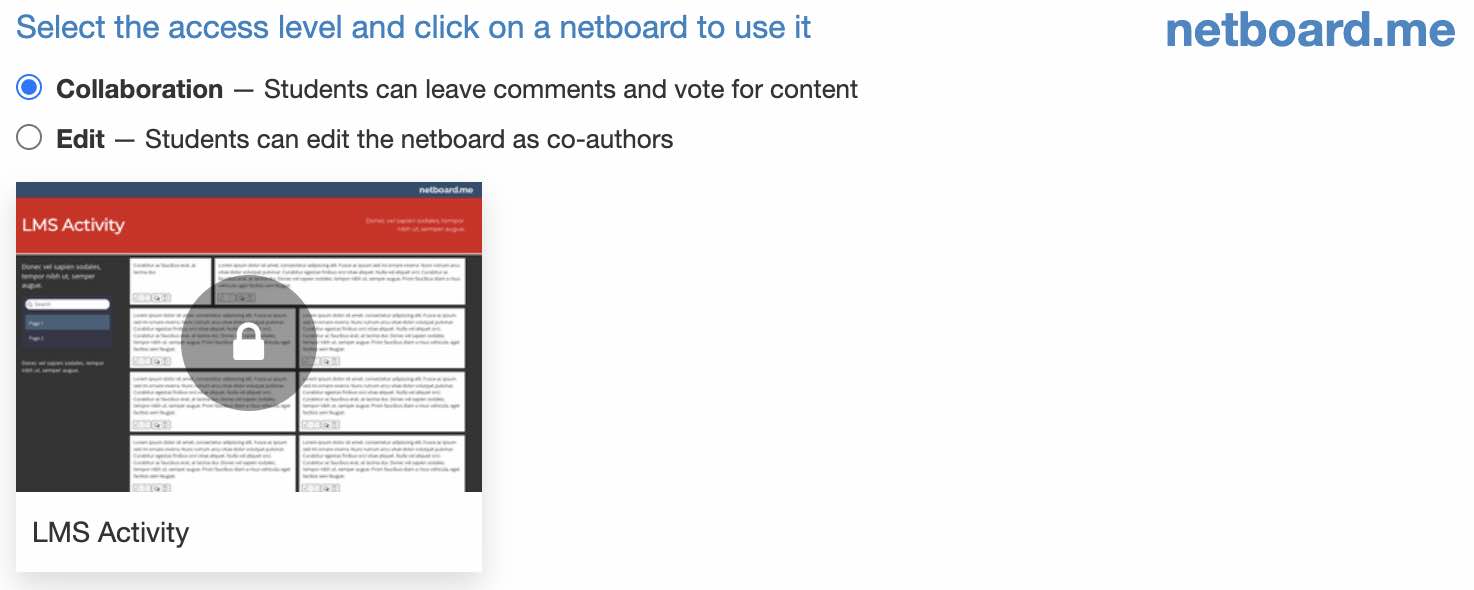
A pop-up window will appear with your netboards. Select the access level at the top and click on a netboard to add it to the course.
Make sure your Canvas administrator has configured the netboard.me LTI integration.
- Open the course to which you want to add a netboard.
-
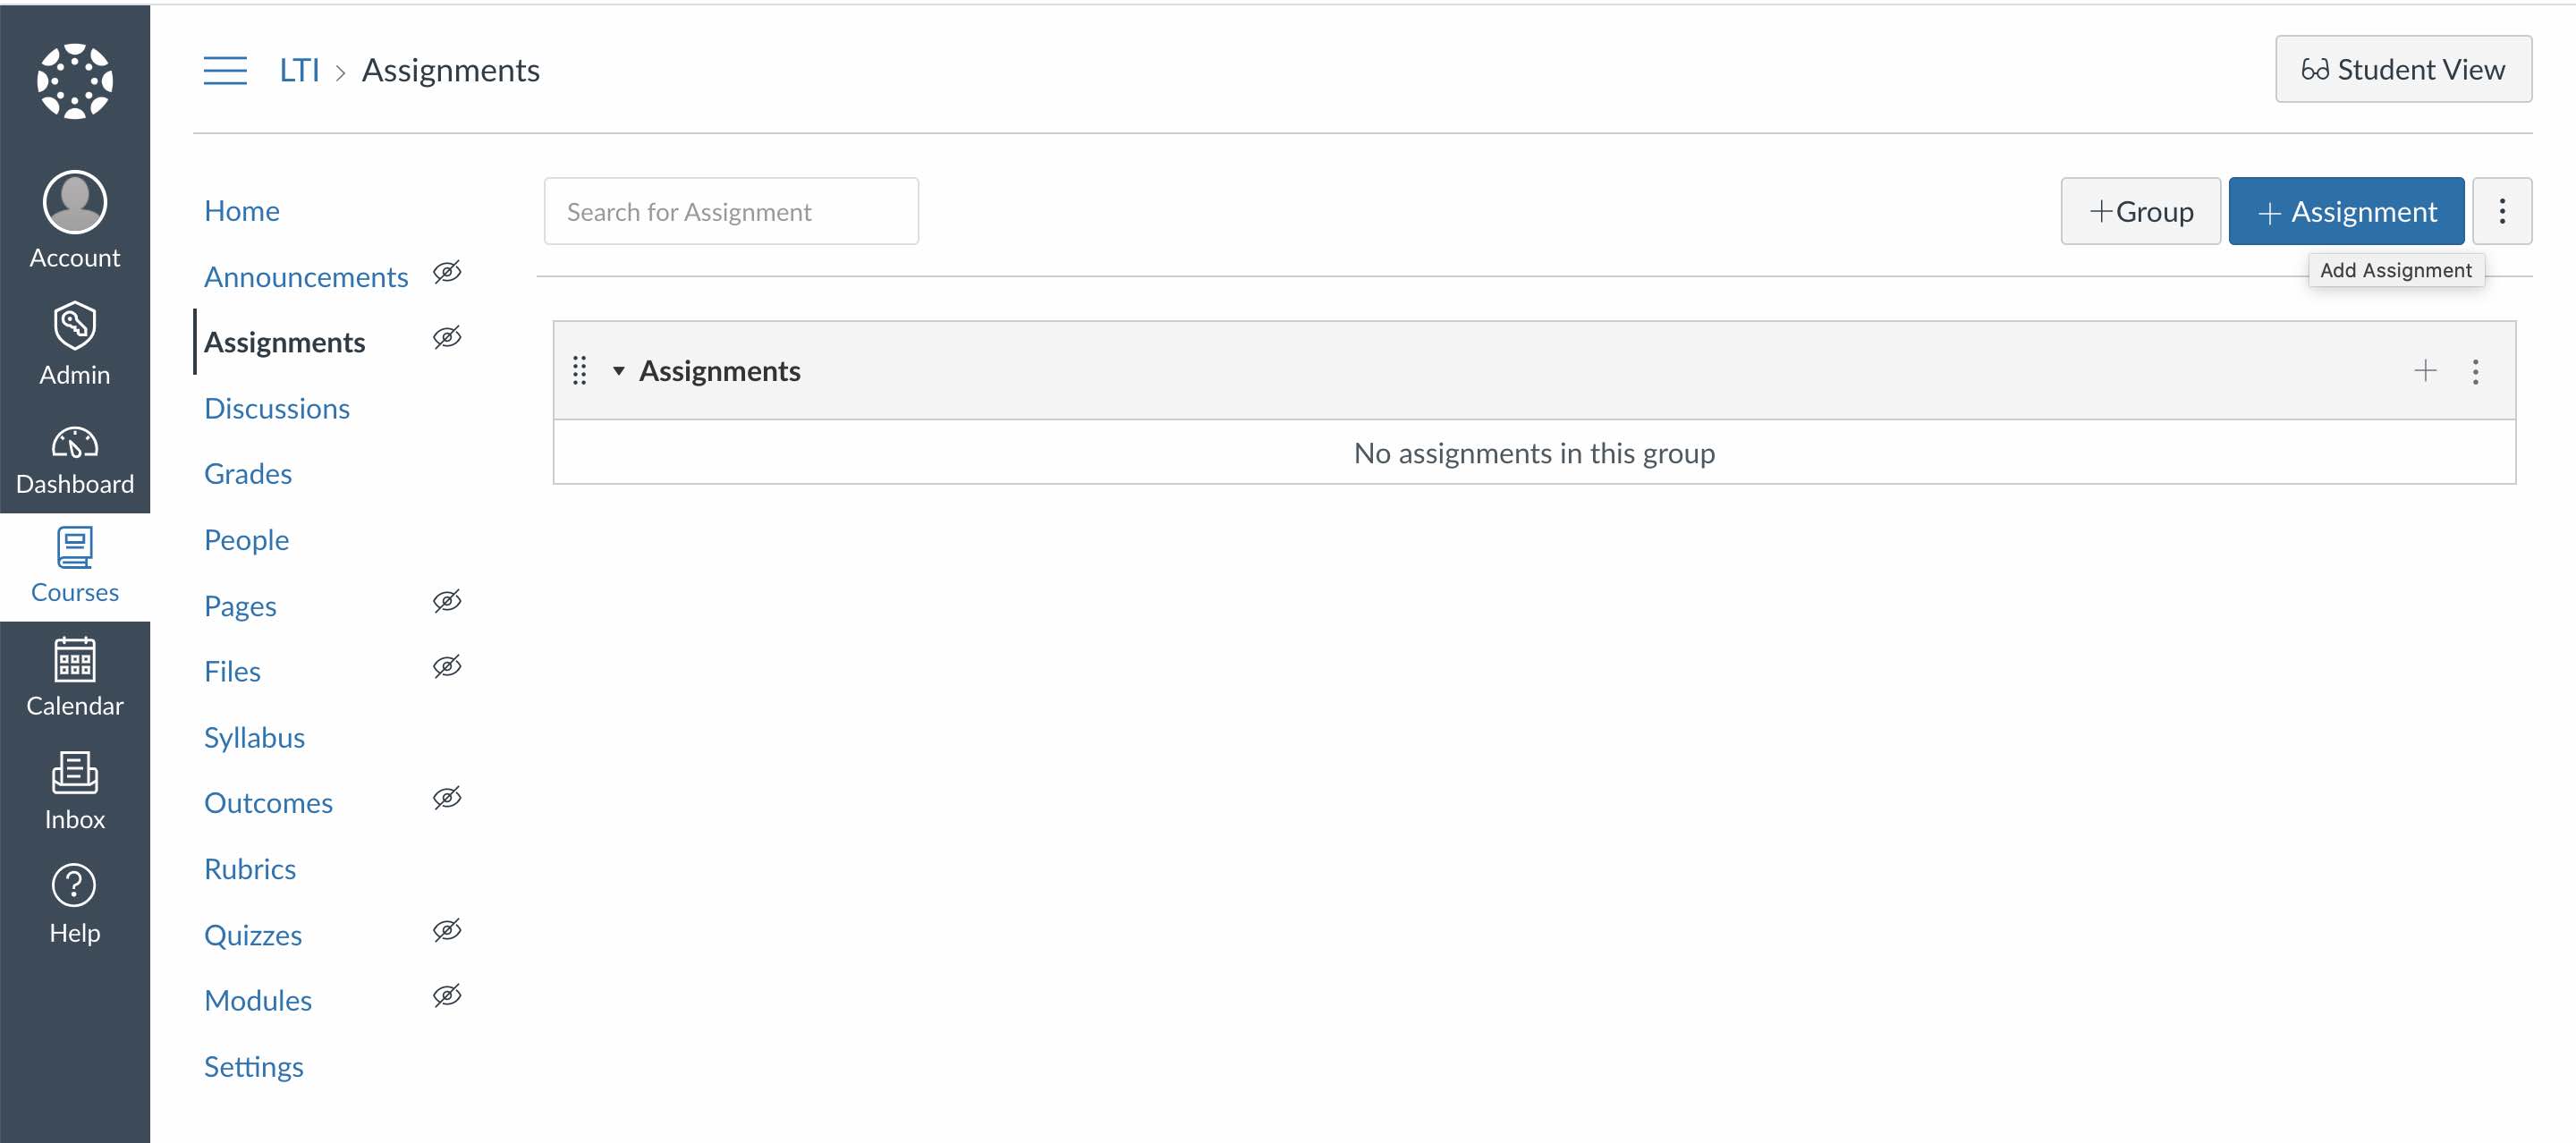
In the Assignments section click the + Assignment button.
-
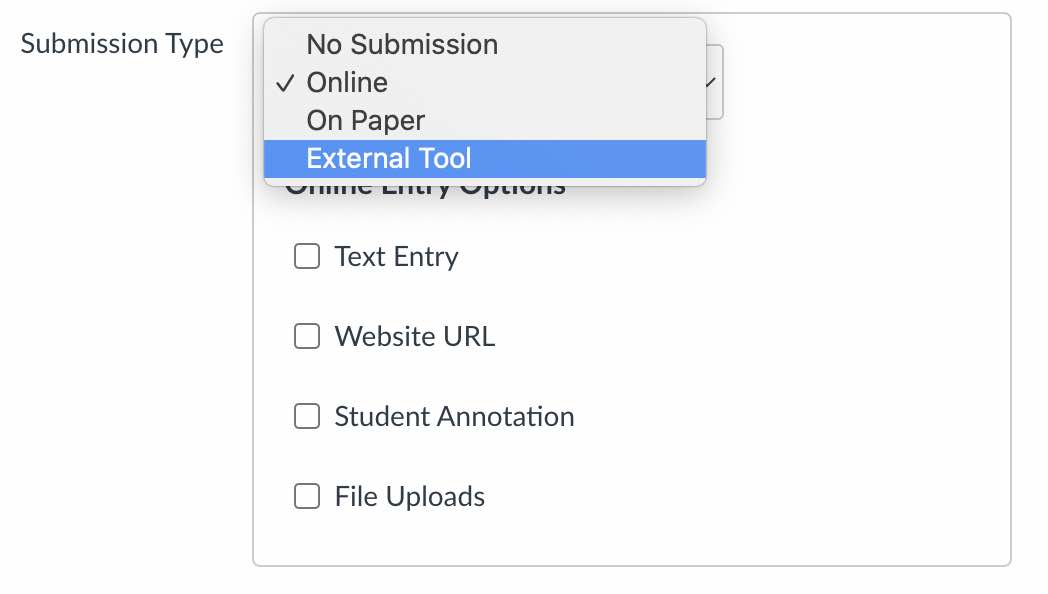
Select the External Tool option in the Submission type selector.
-
Click on the netboard.me tool (it may be named differently by your Canvas administrator).
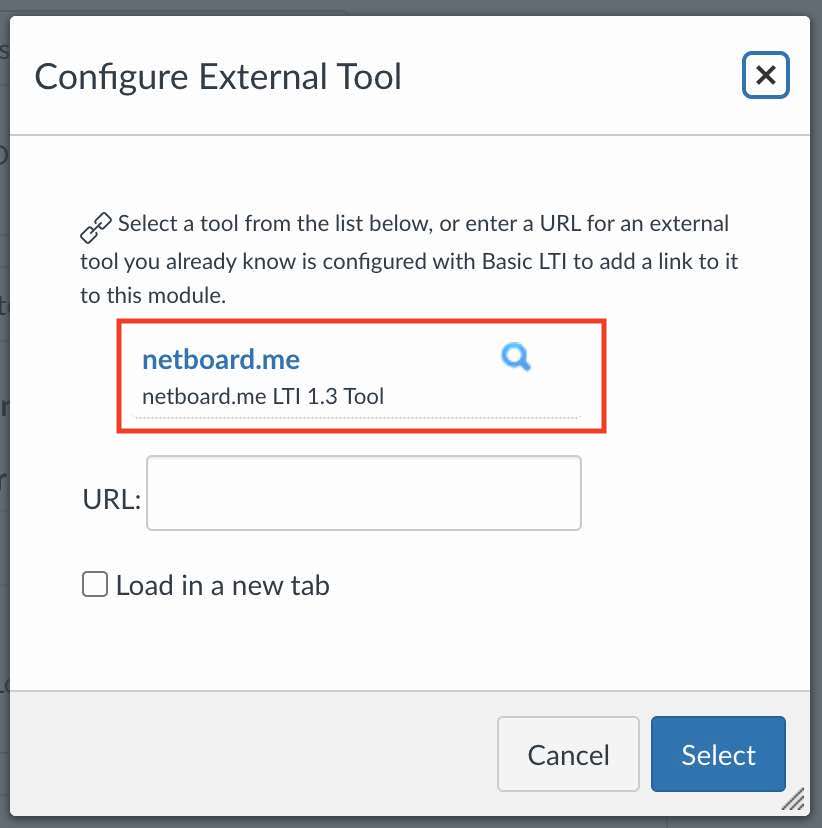
-
A pop-up window will appear with your netboards. Select the access level at the top and click on a netboard to add it to the course.
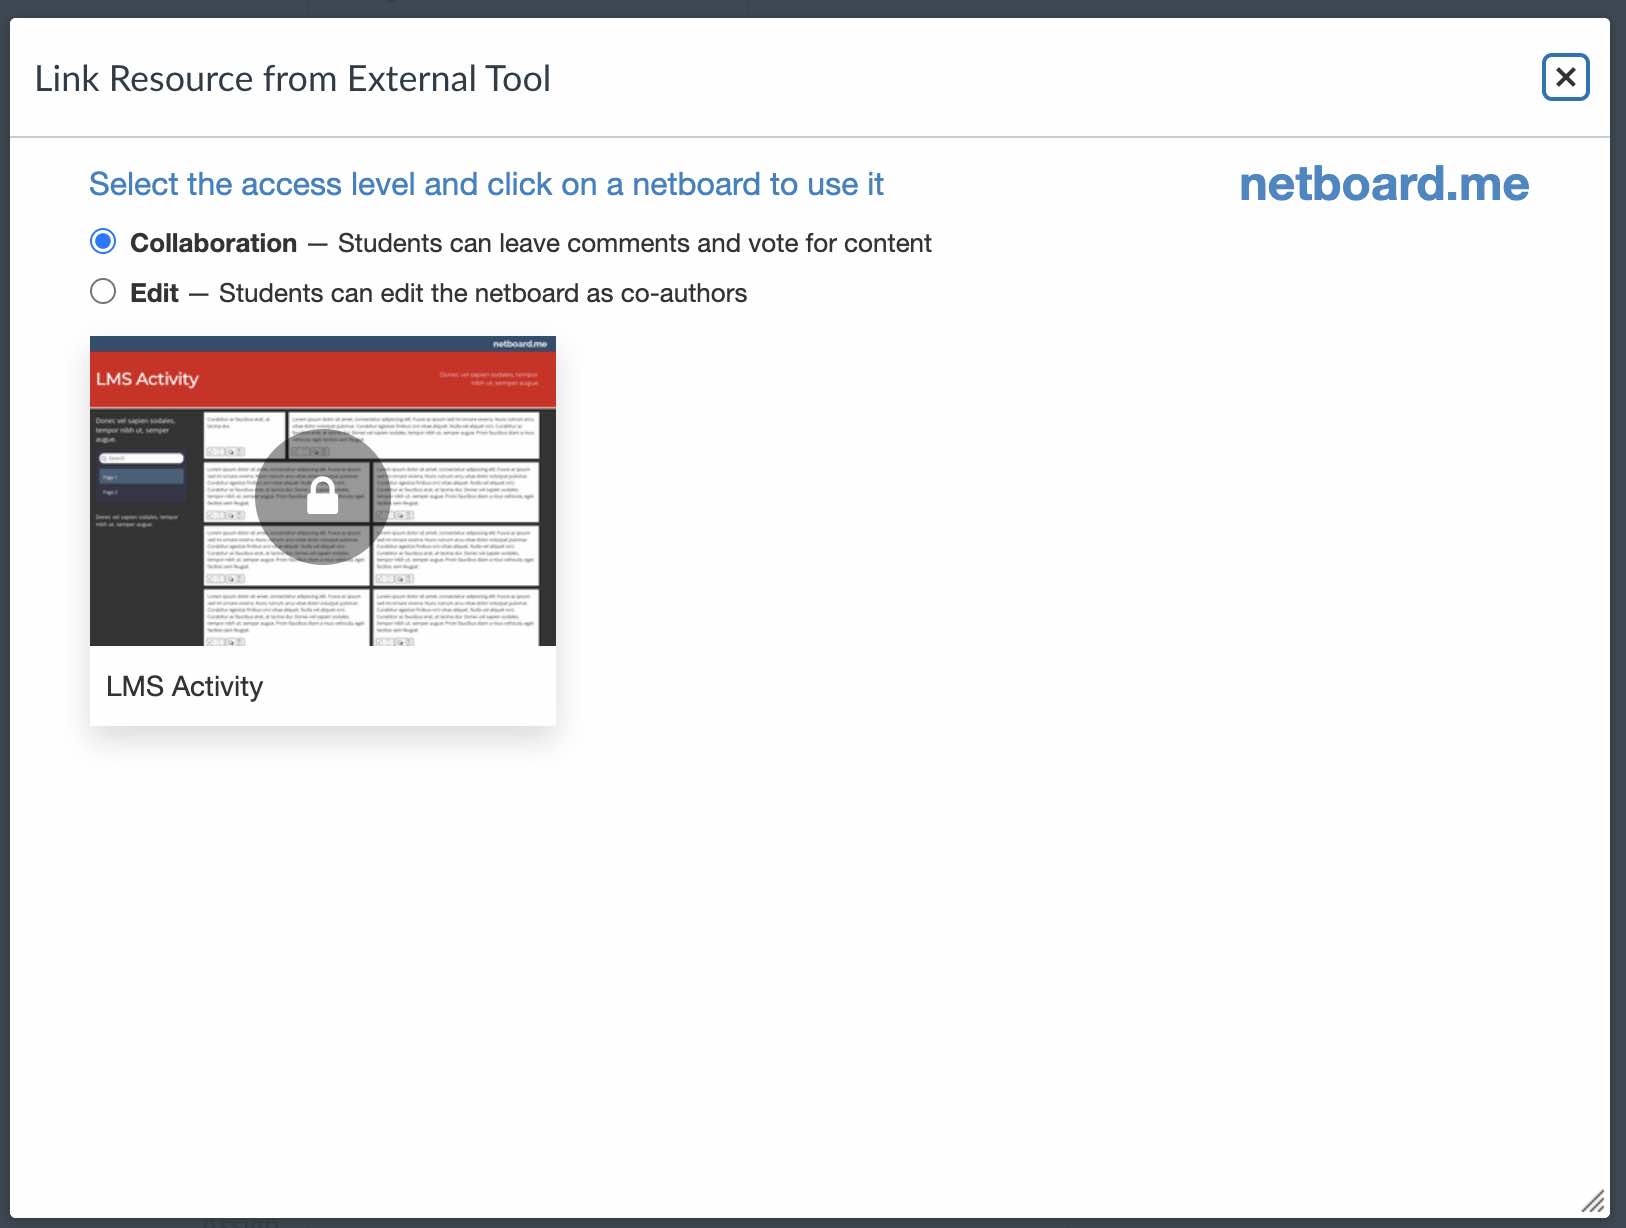
-
For the expected experience you should select the Load in a new tab option.
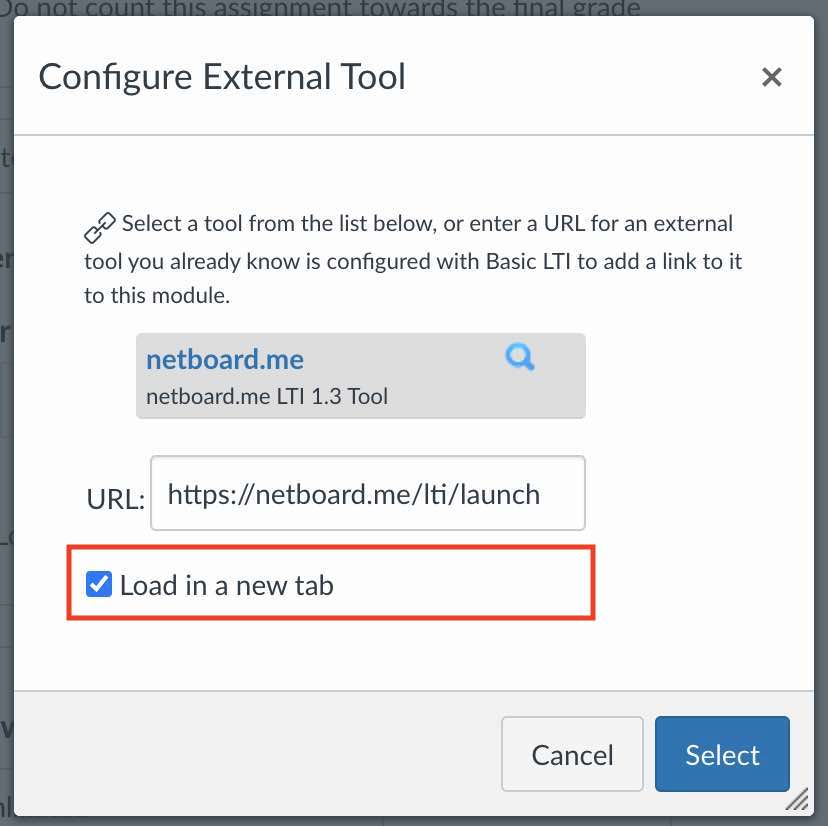
-
Click the Select button.
Make sure your Blackboard administrator has configured the netboard.me LTI integration.
- Open the course to which you want to add a netboard.
-
Go to the Content section.
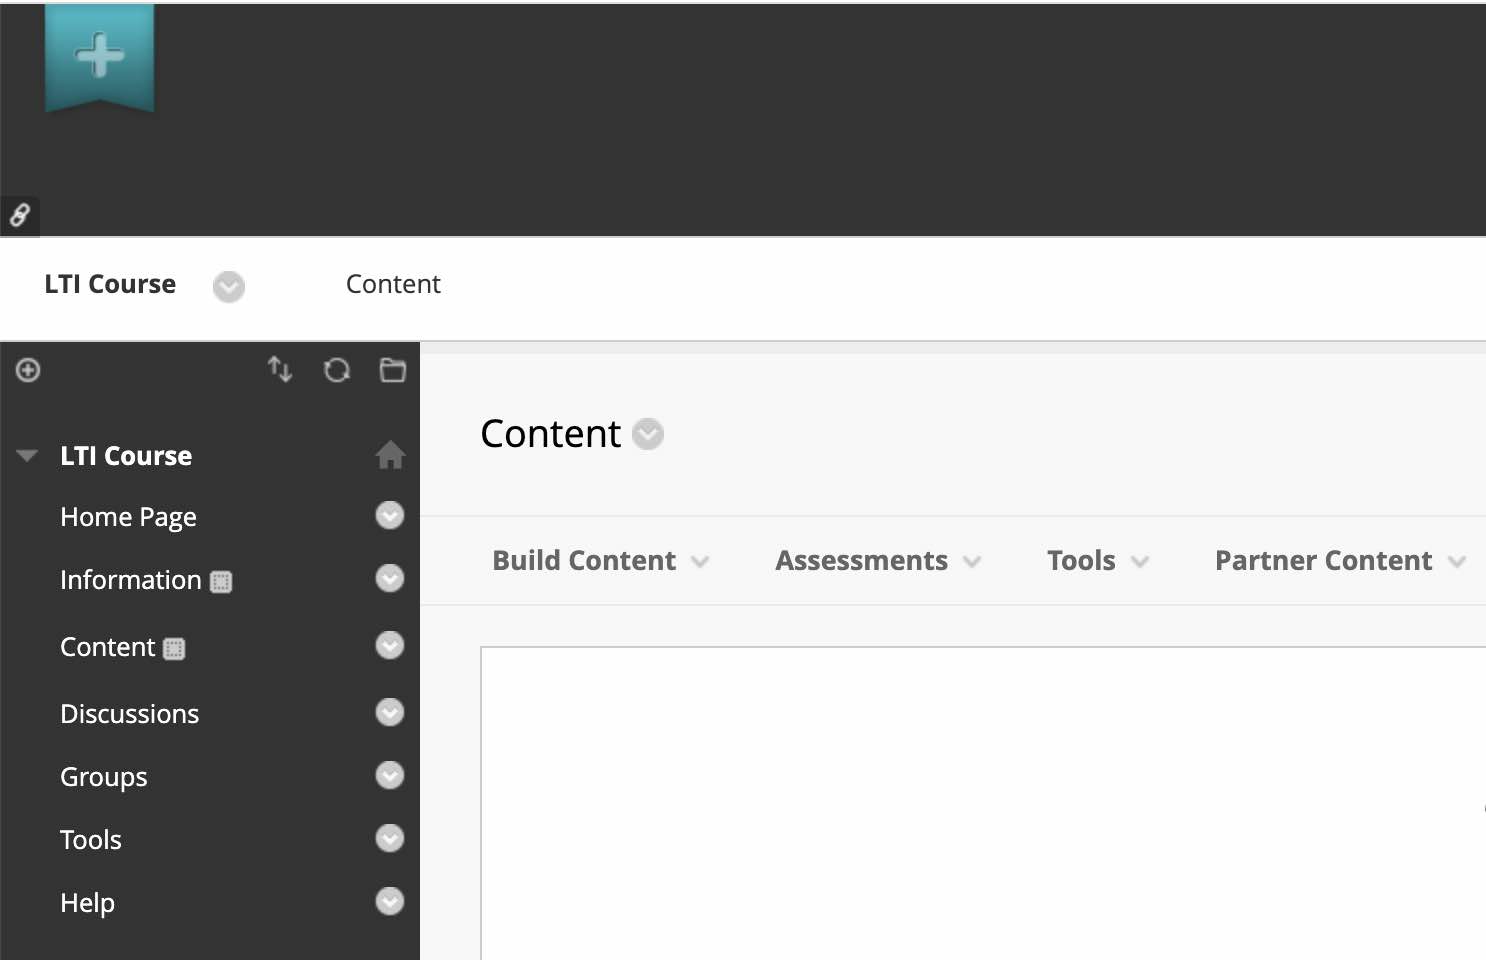
-
Select the netboard.me tool (it may be named differently by your Blackboard administrator) in the Build Content dropdown.
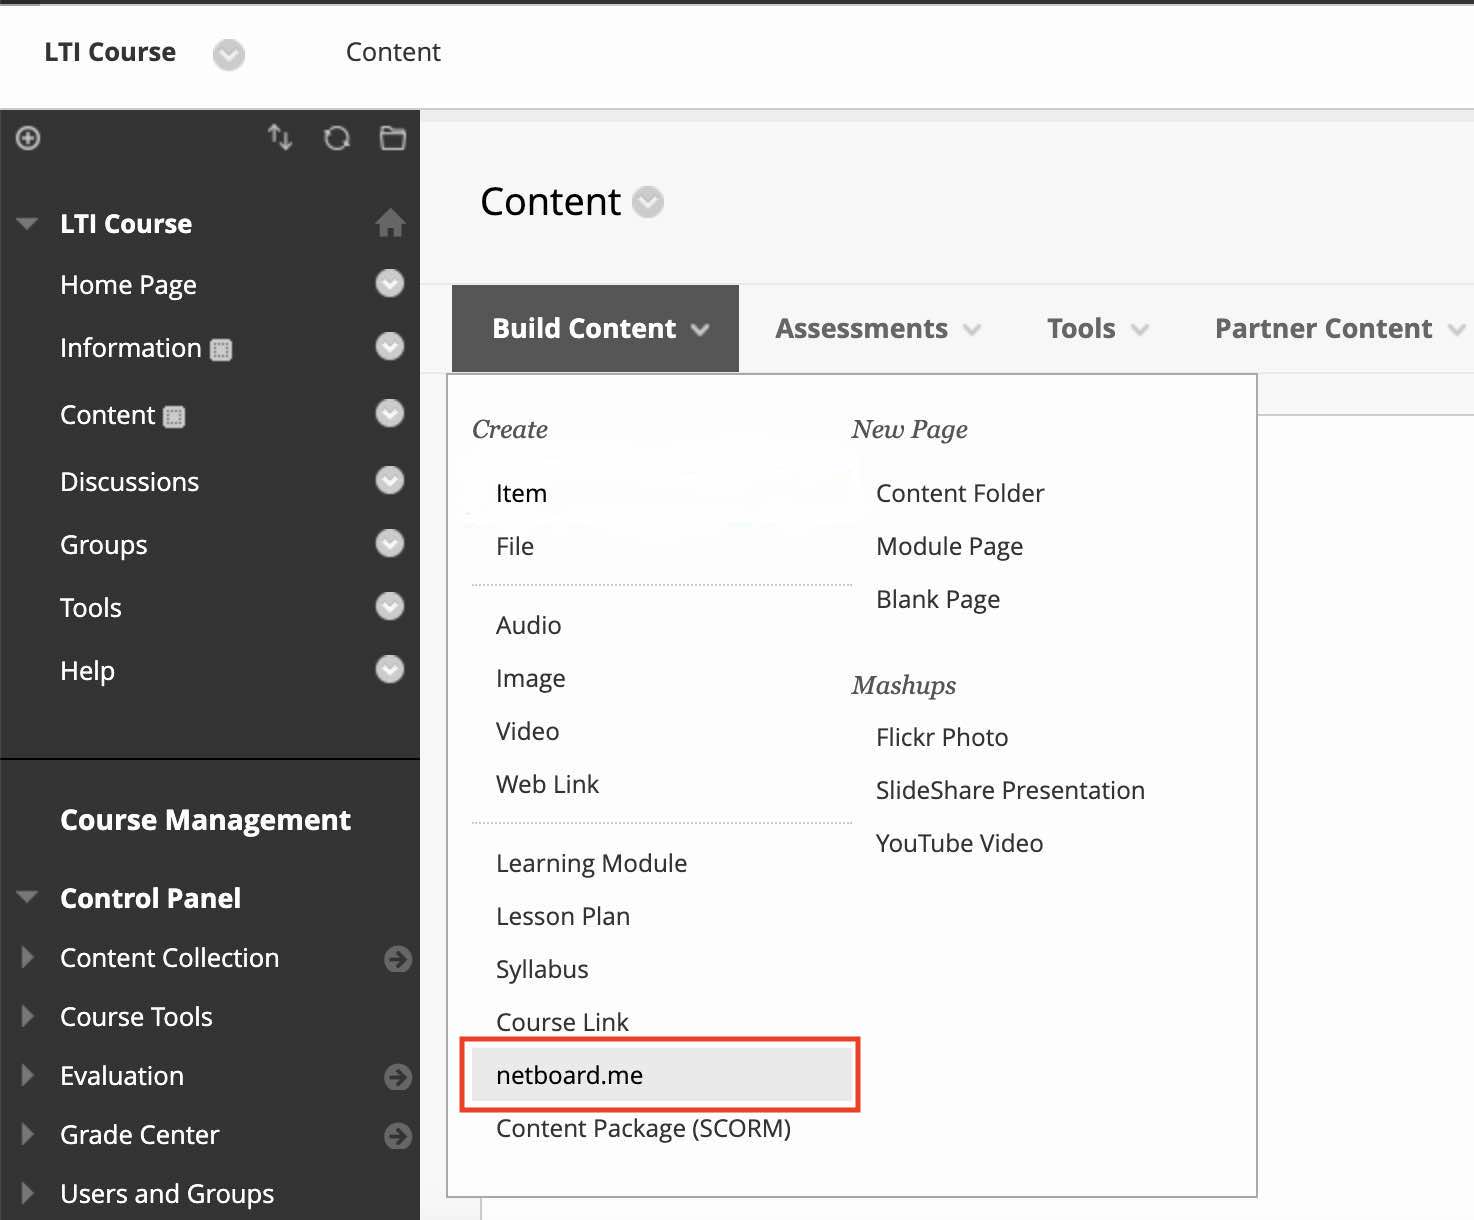
-
Select the access level at the top and click on a netboard to add it to the course.
Post a video
- Switch your netboard to the Edit mode by clicking Edit button in the top menu.
- Enter video URL in the "Post any link" field and press Post button.
Example of the video URL from Youtube: http://www.youtube.com/watch?v=JGXi_9A__Vc - Click Save button in the top menu to apply your netboard changes.
- Click on just saved video post to make video player appear.